
Troubleshooting Guide to Fix QuickBooks Error 1723
Often when we try to work on QuickBooks accounting software with full concentration, there comes an error on the screen distracting us and hindering the smooth working procedure. One such error that might appear on the screen stating “Error 1723: There is a problem with this windows installer package. A DLL required for this install to complete could not be run. Contact your support personnel or package vendor”.
It should be noted that the windows installer damage can lead to this error in QuickBooks software. Get a better grip on QuickBooks error code 1723 and its causes by reading this segment with much care. You can also consult our tech geeks using our support line.
Triggers to QuickBooks error 1723
Talking about the triggers to the QuickBooks error 1723, it comes with a warning message in itself. Moreover, if you have a damaged windows installer, it might lead to such an error.
Methods to follow to fix QuickBooks desktop error 1723
You can head with the below steps, so as to tackle out the QuickBooks error 1723. Let us check out the steps one by one:
Steps to change the permissions of the windows temp folder
- You need to first press windows key
- Further launch the search field
- Also, type in %temp%
- Also hit enter tab
- The windows temp folder will open on the screen
- Just in case, you are making use of one of the following OS- Microsoft Windows 10, 8.1, and 8, then head to the home menu in the menu bar of the windows temp folder and choose properties tab
- You need to now navigate to organize drop down and look for properties
- After the properties window open up on the screen, you would have to look for security tab
- Moreover, click on security tab and also the edit option
- You now need to look for windows username and highlight it
- Put a check mark against the full control in the allow column
- Moreover, click on ok tab
- Last but not the least, reinstall the QuickBooks software
Steps to use QuickBooks install diagnostic tool
QuickBooks install diagnostic tool can be some help in fixing some common desktop install errors. You can run the tool, in order to chuck off the error successfully. After running QBInstall tool, you are required to register or activate QuickBooks desktop once again.
- Start off with downloading the QuickBooks install diagnostic tool
- You need to then save the QBInstall file, which is an .exe file on the desktop
- Just in case there are any opened programs, then make sure to close them first
- Run the downloaded file, and the performance completely depends on your speed of your internet
- Once the tool is installed properly, reboot the PC. Reboot the system and ensure that the components have been updated properly.
Chucking off the QuickBooks error code 1723 becomes a little easy, once the above stated steps are performed carefully. As always, if you have any query, comment, or concern, call us immediately at QuickBooks installation error support team at 1-800-761-1787.

Use the Condense Data Utility and Repair QuickBooks Files
All set to start using the QuickBooks condense data utility? Hang on! Are you aware with the right set of steps involved? Going through this piece of writing will surely help you in learning the right steps to not only use QuickBooks condense data utility, but also make the best out of it. Condense data utility in QuickBooks desktop is basically a feature that allows you to work smoothly and also maintain accurate transactions. This feature ensures that you get the option to remove audit trails, and also can minimize the file size of the company data, without causing the data damage. This feature is available in the newer versions and is regarded a better one.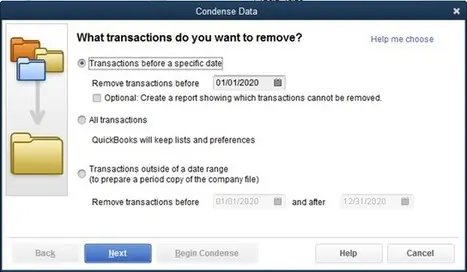
Reading ahead will help you in finding out the steps to use QuickBooks condense data utility successfully. However, if in case you do not wish to perform the steps manually or if you are seeking for immediate expert assistance, then in that case connecting with our tech personnel is recommended.
Errors that can be fixed using QuickBooks condense data utility
You can easily rectify a few errors using the QuickBooks condense data utility. The list is stated below, please have a look:
- If the transactions held up in the form of funds might not get deposited in the process.
- Another error that can be resolved is QuickBooks condense might freeze when minimizing the file size.
- Also, the transactions of the server will get on hold and funds will not be deposited error can be resolved using QuickBooks condense data utility.
Steps involved in using QuickBooks condense data utility
A bunch of steps need to be implemented to successfully use the QuickBooks condense data utility. These steps include the following:
- Initially, you are supposed to move to the file menu.
- Moreover, click on the utilities option.

- Click on the condense data later on.
- Moving ahead, you are supposed to choose any of the options available, as per the requirements.
- For accessing the traditional feature, you simply have tick mark the first option.
- Moreover, click on next.
- You might see a prompt saying working on the file on the screen.
- Once the process ends, you will see a window stating the total reduction and location of the backup before the file optimization.
Scrolling through this piece of writing might have helped you in successfully using QuickBooks condense data utility.
However, if there is any kind of query or if you have any issue, then connecting with our QuickBooks technical support personnel is the one best option that you can go for. Get on a call with our personnel at 1-800-761-1787, and we will be more than happy to help you.

Fix QuickBooks Error in reload.sql when opening a portable company file
Trying to fix QuickBooks error in reload.sql and can’t come up with an ideal solution? Well, if that is the case, you simply need to read this post till the end, or you can also contact our team professionals at 1-844-521-0490, and they will come up with the best possible support services. The QuickBooks error in reload.sql is seen with an error message “Error in reload.sql at line 29886. Sybase message: cannot convert hex string to a varbinary”. Or “Error in reload.sql at line 25514. Sybase message: Right truncation of string data”.
It appears on the screen when you try to open a portable company file or accountant’s copy transfer file in QuickBooks for windows. To know more, make sure to read this post or call us immediately.
Steps to fix QuickBooks reload.sql
The user can perform the below steps to fix the QuickBooks error reload.sql. Let us have a look:
Step 1: Moving the file locally
- The user should open a local folder where he/she wishes to save the file
- The next step is to right click anywhere
- After that select new and folder tabs respectively
- The user should enter the desired folder name and also ensure not to use special characters
- Once done with that, move to the folder where the portable company file or accountant’s copy is saved
- The user should right click the file and select copy
- Also, open the folder that was created and right click anywhere and select paste tab
- If the file name has special characters, then the user should delete them
Step 2: Clean install QuickBooks
- The user will have to close QuickBooks
- And then, uninstall and clean install QuickBooks
- After that, try again to open the file
- And if the user is still unable to restore it, then it is suggested to run QuickBooks install diagnostic tool
By the end of this post, the user might be able to fix the QuickBooks error in reload.sql using the steps mentioned in above. However, if there is any issue in fixing the error, or if the user is need immediate tech assistance, then give us a call at our toll-free number i.e.,1-844-521-0490, and our QuickBooks enterprise support team will ensure to come up with the best possible support services.

Steps to Fix QuickBooks Error 1334 When Installing or Updating
Trying to fix QuickBooks error 1334 and don’t know what to do? If that is the case, we highly recommend you to stick around the post till the end. QuickBooks error code 1334 can be seen with an error message that says “Error 1334: Error writing to file. Verify that you have access to that directory” or “Error 1334: The file cannot be installed. Insert the QuickBooks CD and retry”.
If you are also facing QuickBooks error code 1334, then make sure to read this post till the end. Or you can also contact our team professionals at 1-844-521-0490. Our team will ensure to fix the issue for you.
What causes QuickBooks error code 1334?
The below factors can lead to QuickBooks error 1334. Let us have a look:
- One of the major factors can be QuickBooks installation being corrupted
- Also, if there is corruption in the windows registry from the latest changes made in QuickBooks
- Or if there are any virus or malware infected that leads to corruption in windows files and QuickBooks related program files
- The user might end up in such an error if there is a third-party program deleting the QuickBooks related files
Steps to fix the QuickBooks error 1334
The user can simply add and remove the program using the steps below:
- The very first step is to press windows key and type in msconfig in the search bar
- After that, choose boot tab
- The next step is to select safe boot option along with network option
- Also, click on ok tab and also select the restart tab
- The user should now allow the system to start in safe mode
- Also, the program selected to run will startup
- The user should get an option to open and run QuickBooks software without any obstruction
- The user should also open QuickBooks desktop
- And also click on help tab
- Choose the update QuickBooks option and permit QuickBooks run updates
- Now, move back to the start menu and then type msconfig and deselect the safe mode
- The next step is to reboot the system
- Also, open the QuickBooks software and install updated
- The last step is to allow updates to happen and this would resolve the issue
By the end of this post, it is expected that the above stated steps are enough to get rid of the QuickBooks error code 1334.
However, if you are having any query, then in that case contact us at 1-844-521-0490, and our QuickBooks desktop support professionals will ensure to provide you with immediate technical assistance.

How to Write Off Bad Debt in QuickBooks Desktop?
Want to learn the process to write off bad debt in QuickBooks? Well, we have got you covered. A bad debt is basically an amount that a business or a company is unable to recover from the debtor in case the borrower has gone bankrupt or is unable to pay the debt for some or the other reason. Bad debt is generally related to account receivables and is also referred to as non-collectible account.

In today’s segment, we will be discussing the process to write off bad debt in QuickBooks desktop. By writing off bad debt in QuickBooks, one can clear the invoices from the account receivables that assist in getting the appropriate net profit amount in QuickBooks. To know more, make sure to scroll through the segment carefully. Or else give us a call and let our accounting professionals handle the situation for you.
Steps to write off bad debts in QuickBooks desktop
You can perform the steps below, so as towrite off the bad debts in QuickBooks desktop. Let us explore the steps one by one:
Step 1: Create an expense account named bad debt
- Move to the list in the top navigation bar and then select the company option.
- Navigate to the chart of accounts.

- Create a new expense account by clicking on the account tab and then hit new.
- Choose expenses.
- Type in bad debt in the account name field and also choose save and close tab.
Step 2: Recording and Closing the bad debt
- Choose the receive payments tab in the customer-menu.

- Followed by entering the customer’s name in the receive from and $0.00 in the payment amount. Important point: In the description the user can write invoice number of the bad debt for tracking.
- Click on the discount and credits tab.
- Enter the amount of bad debt the user wishes to write off in the amount of discount field.
- Now, in the discount account, choose the bad debt account that was created in the above step.
- Click on save and close tabs.
Still unable to write off bad debt in QuickBooks desktopsuccessfully. Well, need not to worry, we are for your rescue in that such a situation as well. All you need to do is to give us a call at our QuickBooks enterprise customer support numberi.e.1-800-761-1787, and let our experts assist you.
Recommended readings:
Configure Firewall and security settings for QuickBooks desktop
 1
1

How to Fix Data Damage in QuickBooks Desktop Company File?
Seeking for the process to fix data damage on QuickBooks desktop company file? Well, in that case, your search ends over here. In today’s segment, we will be talking about the steps and procedures that can be followed, so as to fix the data damage on the QuickBooks desktop company file. A corrupted QuickBooks company file can be a major issue for many of you. Company file is one of the most important aspects of the QuickBooks accounting software, and any error related to it should be tackled out immediately.
If you are also interested in learning the process to Fix data damage in QuickBooks desktop company file, make sure that you stick around till the end. Or else use our customer support helpline and contact our professionals for any sort of further assistance.
What instigates the data damage error in QuickBooks?
You might end up in such an error due to a handful of factors. Let us check out the triggers one by one:
- Just in case there is any virus attack to the hard drive where the database is stored.
- Another reason can be, if there is a sudden power surge or drop, then it might trash the entire hard drive leading to such an issue.
- Or, if the data file size has expanded beyond the prescribed limit.
- If the system lacks certain resources which includes, RAM, virtual memory, network interface cards, routers, network cables, etc.
- You might end up in such an error if there is inappropriate shut down of the system.
Steps to perform in order to chuck off QuickBooks company file data damage
Below methods can be of some help in fixing the QuickBooks company file data damage. Let us explore each of the methods one by one:
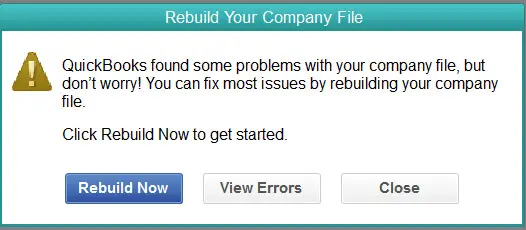
Method 1: Repair the company file using Rebuild data tool
Repairing the company file using the rebuild data tool involves the following steps. Let us have a look:
- Move to the file menu and then move to the utilities tab and also choose rebuild data.
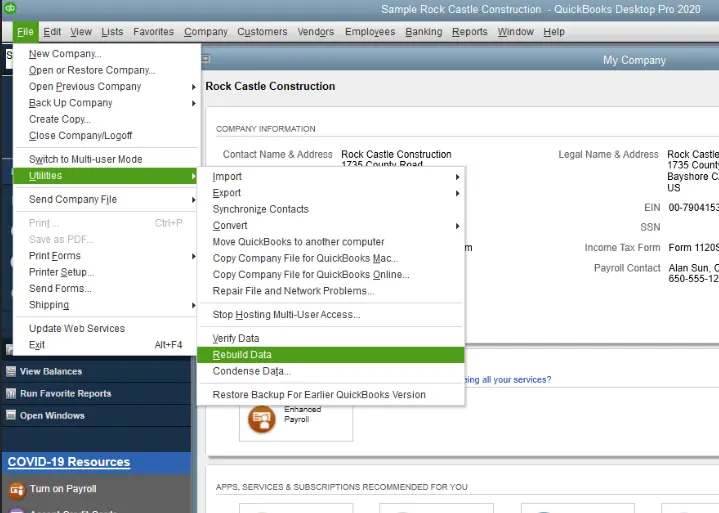
- Choose ok tab on the QuickBooks information window. Pay heed to the onscreen steps to save the backup.
- Let the tool repair the file. This process might take some time. And it might seem that the software is stuck, but as long as you are able to move your mouse, the tool is working.
- Once it finishes, click on ok tab.
- Move to the file menu and then hover over the utilities tab and also choose verify data.
- Let the tool check the file for data issues.
In case the software is unable to detect any issue, then click on ok tab. After this, you can use your company file, as there is no data damage. Whereas, if the software detects an error, then you will have to select rebuild now tab.
Method 2: Manually repair the company file by rebuilding the data
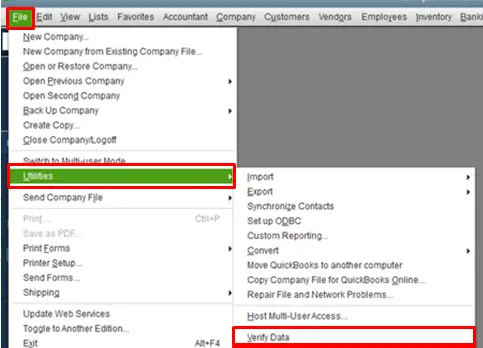
For fixing the issue manually, verify results window should be accessed. Before carrying out the steps below, it is recommended to back up the company file. The steps to be followed for manually fixing the issue are:
- Initially, move to the file menu. And further head to utilities tab.
- Go for verify data.
- Let the tool check the file for any sort of data issues.
- Choose expand all to see the errors from the verify results screen.

- Moving ahead, select see online article and carry out the steps to fix the issue.
Fixing data damage on QuickBooks desktop company file isn’t a tough nut to crack, but can be tackled easily with some set of steps and procedures that are discussed earlier in this segment.
Whereas, if you are still unable to deal through the issue, then in that case, simply consult our QuickBooks error tech professionals at 1-800-761-1787, and let them perform the needed steps for you.
Other Articles to read:

How to Turn on Manual Payroll in QuickBooks Desktop?
Learn the process to turn on manual payroll in QuickBooks desktop by reading the blog post ahead. Small businesses try to maintain QuickBooks manual payroll. This particular feature allows the user to track amounts and much more. In case you are also looking for the process to turn on manual payroll in QuickBooks, make sure to read this post till the end.
Or you can also contact our team professionals right away at 1-844-521-0490, and our QuickBooks support team will ensure to provide you with immediate tech professionals.
Steps to turn on manual payroll in QuickBooks
For turning on manual payroll, the user can perform the following steps:
- The very first step is to choose the preferences tab

- And then, from the edit menu click on the payroll and employee option
- The next step is to click on the company preferences tab and choose no payroll

- The user is then required to disable the payroll feature
- And also view the payroll item list
- It is recommended to select manage payroll items from the employees menu and choose view/edit payroll item list

- A payroll list will look like any other list with a name and type associated wit it
- The user would have to add an item and repeat the steps
- The last step is to choose the payroll item and choose new tab
Steps to calculate payroll
- The user should have the information related to the company file, which includes the company name, address, and federal tax ID numbers
- And, also the user should have the knowledge about the employees, which includes the general information related to the employees payroll
- The user should also have the knowledge related to the information of payroll items
- Tax tables for federal, state, and local withholdings
Performing the steps above will help in turning on manual payroll in QuickBooks desktop. However, if the user is unable to turn on the manual payroll in QuickBooks, then in that case contact our 24/7 QuickBooks customer supportteam professionals right away using our toll-free number i.e. 1-844-521-0490, and our team will ensure to come up with the most effective solutions.

How to Fix QuickBooks Error 15241 (Payroll Update Failed Error)?
The tech world has a lot to offer, and as we step closed to complete digitalization, there is a customized piece of technology for every business. Similarly, in the accounting industry, QuickBooks accounting software is available for all sized businesses. However, this software might fae certain issues. One such error we will be talking about is QuickBooks payroll error 15241. This type of error could be seen when you open the QuickBooks payroll function.
This segment will provide you with the list of steps that you can consider for fixing QuickBooks error code 15241. Whereas, if you don’t want to manually perform the steps, then you can take assistance from our accounting experts using our helpline.
What instigates the QuickBooks error 15241?
You can bump into the following error due to the below reasons:
- The major factor causing such an error can be if the file gets deleted mistakenly by any of the programs.
- Also, if the registry files are corrupted.
- Moreover, if the downloaded files or the installation file gets corrupted.
- In case the installation of the QuickBooks software is incomplete.
- Any virus or malware infection.
Methods to fix the QuickBooks error 15241
The below steps can be used to fix the QuickBooks error 15241:
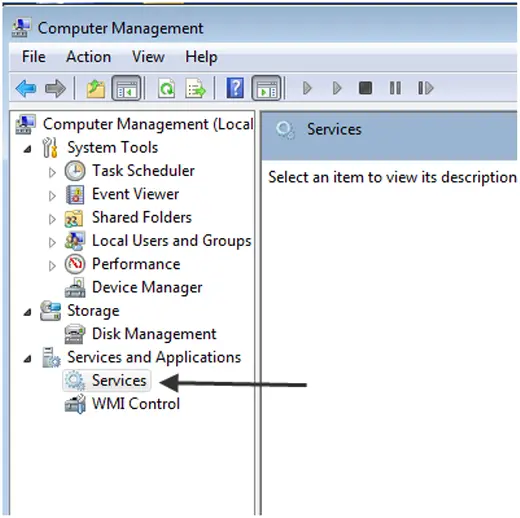
For windows 8/7/vista and windows 10 users
- The very first step is to close QuickBooks desktop.
- Further, tap on windows start tab from the keyboard and right click the system.
- Select manage tab.
- Now move to the Services ad applications window and then hit a click on Services
https://qbsenterprisesupport.com/wp-content/uploads/2020/04/Computer-Management-Screenshot.png.webp
- Next, scroll down and double click the Intuit QuickBooks FCS service.
- After that move to the general tab and then also click on the drop-down list of start-up type. And then opt for Manual option.
- After then hit a click on OK tab.
- The next step is to download the QuickBooks desktop product updates and update the payroll tax tables.
Windows 10 users
- Start with clicking on services tab and select applications from the left pane.
- Click on services in the right pane.
- Double click the operation on Intuit QuickBooks FSC key.
- Click on the startup type drop down option.
- Choose the manual in the startup window.
- Further go for the apply tab.
- And select the start option and choose ok tab.
- Open QuickBooks desktop again.
- And download QuickBooks desktop product updates.
- Last but not the least update latest payroll tax tables.
Steps to update payroll tax table
The below steps can be followed, so as to update the payroll tax table. Let us have a look:
- Move to the employees menu and select the get payroll updates.
- Check marks the download entire update checkbox and move to the update option.
- End the process when the download complete pop-up window appears on the screen.
If you are new to this accounting software and don’t want to experiment fixing the QuickBooks error code 15241, then feel free to reach out to our QuickBooks payroll tech supportprofessionals at 1-800-761-1787for more information and better guidance to make the best use of QB accounting software and rectify this error.
Read more:
common issues of QuickBooks during the Windows 10 updates
?)
How to Repair the QuickBooks Error Code 4120?
Every time a new or unacquainted user starts using QuickBooks, it is likely that he/she will encounter an error. These errors are displayed with a specific code, one such code is QuickBooks error code 4120. This error basically can be seen at the time of installation of QuickBooks desktop. Also, it appears with an error message “QuickBooks has encountered a problem and needs to be shut down without any further explanation”.
Similar to other software, QuickBooks is most likely to experience messages that displays different error codes every time. However, every time an error is seen, a sound and efficient solution is derived by the software experts. Similarly, the QuickBooks error code 4120 also have effective solutions. Keep reading to unleash these solutions. Reach out to us for any questions and inquiries using our helpline.
Source: https://qbsenterprisesupport.puzl.com/_news/How-to-Repair-the-QuickBooks-Error-Code-4120%253F/306925
The triggers to QuickBooks error 4120
You can end up in such an error due to the following factors:
- In case any windows registry has been corrupted due to any changes occurring to QuickBooks
- Also, if QuickBooks executable file or other components are marked unsafe.
- Moreover, if the file of QuickBooks is deleted by some program.
- If QuickBooks is incompletely installed or there is some corruption.
- When there is any virus on the system harms the files that are related to windows.
Steps to rectify the QuickBooks error code 4120
You can try resolving the QuickBooks error 4120 by performing the steps below:
Method 1: Running disk cleanup

- Start with considering the backing up the files and freeing up space on the hard drive
- Clear the cache and reboot the system.
- You can run the disk cleanup and open the explorer window and right click the main directory.
- The last step is to click on properties tab and click on the disk cleanup.
Method 2: Copy company file to another system
- Herein, you need to copy all the company related files to some other system. Check if you are able to open the files or not in another system.
- If the files open, then it is suggested to repair the windows of the previous system.
- And if the files do not open in other system as well, then it means that the files are damaged. These files can be fixed by using the QuickBooks file doctor.
Eliminating the QuickBooks error code 4120isn’t a tough nut to crack, once the illustrated steps are implemented.
Despite that, if you continue to land into the same error again and again, then in that case do not hesitate in consulting our CPA’s and U.S. based accounting professionals using our QuickBooks enterprise support linei.e.1-800-761-1787.
Other helpful articles:

What is QuickBooks Payroll error 557 andHow to Fix It?
It is pretty much common that you might bump into some or the other error while working on this accounting software. One such error that we will be discussing in today’s piece of writing is QuickBooks error code 557. This error is often seen with a warning message that states as “QuickBooks has encountered a problem and needs to be close. We are sorry for the inconvenience.” This error usually applies to the windows XP, Vista, 7 and 8.

If you are interested in learning the process to tackle out QuickBooks error code 557, then make sure to stick around till the end. Or connect with our accounting professionals using our helpline.
What leads to QuickBooks error code 557?
This error can be instigated by the following factors:
- Just in case the installation and uninstallation process are aborted.
- Or if you have deleted the QuickBooks directory file.
- Another reason can be if you have shut down the system directly from the electronic board.
- Moreover, if the system is damaged due to any sort of virus or malware attack.
Solutions to rectify the QuickBooks error code 557
You can try fixing the QuickBooks error CC_557 by performing the below steps:
Method 1
- You need to turn on the system and log in as admin.
- Move to the programs tab.
- Select accessories option and decide on the system tool.
- Move to the system restore tab.
- A new screen will be seen with the choices you have to pick to restore the system and click on successive tab.
- Hit a click on list click a restore point.
- Select the foremost recent time in order to restore the system.
-
- Find confirmation window and click on the successive tab.
- The restoration method will begin.
- Reboot the system.
Method 2
- To begin with open QuickBooks desktop.
- Move to the help menu and click on update QuickBooks desktop.
- Click on update now tab.
- Check on reset update and click on get updates tab.
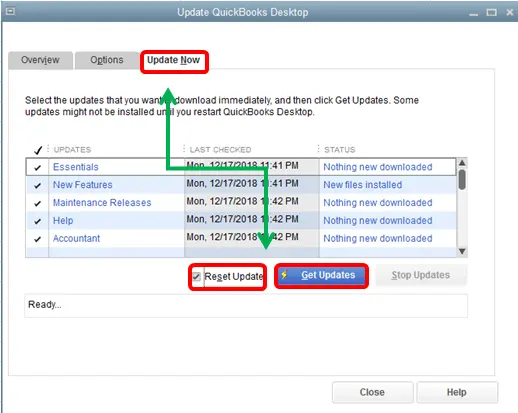
- This might take some time to update the QuickBooks desktop.
Performing the above stated steps might help in getting rid of the QuickBooks error 557 successfully.
However, if you have any query or if the error persists even after implementing the steps discussed in above, then in that case we would highly recommend you to make use of our dedicated QuickBooks enterprise tech support line i.e. 1-800-761-1787. Our experts will fix the issue for you immediately.
Related Posts:

Troubleshoot Multi-user Issues for QuickBooks Desktop for Mac
It is pretty much common that you might bump into some or the other error while working on this accounting software. One such error that we will be discussing in today’s piece of writing is QuickBooks multi-user issues in Mac. This is usually seen when you try to share a company file. In this segment, we will be talking about the processes to fix the multi-user issues in QuickBooks for Mac.
If you are interested in learning the process to tackle out multi-user issue in QuickBooks desktop for Mac, then make sure to stick around till the end. Or connect with our accounting professionals using our helpline.
Methods to follow to fix the multi-user issues in QuickBooks desktop
You can perform the below steps to fix the multi-user issues in QuickBooks for Mac:
Step 1: Verify QuickBooks server running and the company file is shared or not.
Step 2: Check Mac OS firewall settings.
Step 3:Verify file sharing permissions are set correctly on the host system or not.
- Click on apple menu and opt for the system preferences.
- Choose the sharing icon.
- Tick the checkbox for file sharing.
- Add that folder where the company file is situated in the share folder.
- Ensure that the permission to read and write for everyone or for the specific users who will be using QuickBooks.
Step 4: Verify that the bonjour service is working properly.
Step 5: Test the network configuration.
Step 6:Set up the peer-to-peer direct connection.
- Log out both systems and plug each of the cable into a system’s ethernet port.
- When the system starts then you need to permit bonjour service to see both the systems to each other. To verify that the new finder window and see if each system can see the other in the shared section.
- Pick one system as a host. You will have to open file or enable the multi-user mode from a file or enable multi-user mode.
- Open QuickBooks in the second system from the shared files section or open the company file.
Performing the above stated steps might help in getting rid of the QuickBooks multi-user issues in Mac successfully.
However, if you have any query or if the error persists even after implementing the steps discussed in above, then in that case we would highly recommend you to make use of our dedicated support line i.e. 1-800-761-1787. Our QuickBooks enterprise customer supportexperts will fix the issue for you immediately.

How to Fix QuickBooks Connection Has Been Lost or Abort Error?
QuickBooks accounting software is a continually evolving platform, as opposed to other software present in the industry. Since its inception, it has been growing and coming up with different features and functionalities each time. It isn’t without fault though. There are still a handful of issues with QuickBooks software. One such error can be connection lost error. This error is seen with an error message that states as:
“The connection to the company file has been lost. QuickBooks must close immediately. Any unsaved data will need to be re-entered”.
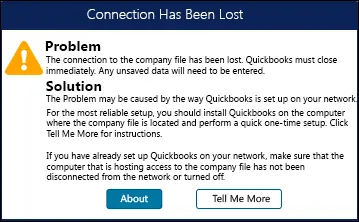
Let’s take a look at the steps to rectify this error successfully. Whereas, if you don’t want to invest your time in fixing this QuickBooks connection has been lost error manually, then we have a solution for you, connect with our tech savvy accounting professionals at our customer support line and we will ensure to provide you with immediate assistance.
What triggers the Connection has been lost problem?
The connection lost error could be seen due to the following factors:
- In case the data in the company file gets damaged.
- Or if the system in a multi-user installation is running different version of QuickBooks.
- Just in case the company file is stored on another system or on a portable drive and connection to the storage device is disrupted.
- In case the system on a network is configured to host the QuickBooks company file.
Methods to perform to fix theConnection has been lost error in QuickBooks
You can try performing the below steps in fixing the QuickBooks error connection has been lost issue.
Method 1: Disable the power management settings on the server.
- Start off with opening the power management settings in the windows control panel.
- Press windows key.
- Type power options and select the power options from the results.
- Turn off all sleep, standby, and hibernation modes on the host system. Refer to the windows help and support for any further information about power options.
Method 2: Remove and recreate the ndfile
- Press windows key and type QuickBooks database server manager.
- Select the QuickBooks database server manager and hit on the add folder tab and spot the folders storing the company files.
- Click on scan after the folders are added.
- The data files appear under QuickBooks company file and hit close tab.
- End the process by browsing to the folders containing the company files and ensure that the file band was created for each company data file.
Once you perform the above stated steps, you are all set to start using the QuickBooks software and perform your daily accounting activities with facing QuickBooks connection has been lost error.
However, just in case you need any of our assistance, then reach out to our technocrats using our QuickBooks error support number i.e. 1-800-761-1787, and get instant assistance.
More helpful articles to read:

Learn How to Fix QuickBooks Error 1722 (System Error Code)
Bumped into QuickBooks installer error 1722? If yes, then your search ends over here. The QuickBooks installer error results in slowing down the windows very slow and the PC starts to freeze at regular intervals. In case there is any issue with the coding when structuring the software, such an error is most probable to occur. This is basically a run time error that you can fix with the help of windows restore method. The same error could be seen when the Microsoft.net framework or any other component of windows is damaged.

To know further details related to the QuickBooks installer error 1722, make sure that you read this post carefully till the end. Or consult our team professionals.
Triggers to the QuickBooks error code 1722
Following can be the triggers to the QuickBooks error 1722:
- In case of incomplete or damaged installation of QuickBooks application such an error could be seen.
- You can also see the following error in case of windows corrupted or incomplete QuickBooks software installation.
- If there is any virus or malware infection, then such an error could be seen.
- Damaged windows registry can be another valid reason.
Methods you can follow to fix QuickBooks error 1722
You can try fixing the QuickBooks snag 1722 using the following methods:
Method 1: Updating windows
- Under this method, you are required to right click the start tab and then select settings tab.
- Click on update and security tab.
- Select windows update section.
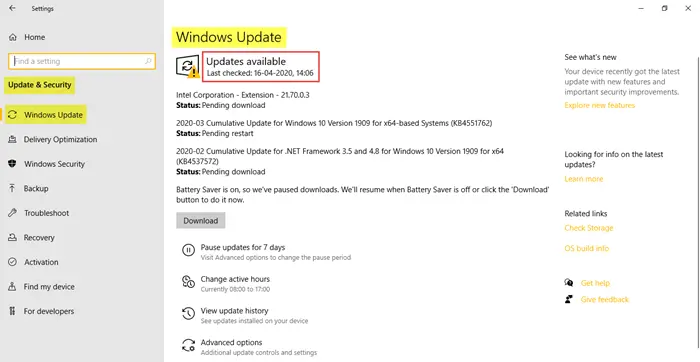
- Click on the check for updates tab.
- And also, the updates will start installing automatically.
- The reboot the system.
Method 2: Using QuickBooks repair tool
- You need to know the location of QuickBooks file and click on select file tab.
- Click on search files tab.
- For scanning the selected file, click on scan file option.
- Click on company tab.
- And click on customer tab to see the customer related information.
- Hit the employees tab.

- And click on the repair tab, after which you will see the save as dialog box.
- Hit the start tab.
- And you will then see a message on the screen as repair process completed successfully.
- The last step is to click on ok tab and close the box to end the process.
Shunning off the QuickBooks error code 1722 is a task. Once you are thorough with the steps that we have tried to discuss in this segment, it would be easy for to deal with this error.
Whereas, if you are still troubled by the same error, then in that case we can help you. All you need to do is a to ring up to us using our dedicated support line i.e.1-800-761-1787. Our QuickBooks enterprise support team will be available round the clock.
Other Interesting Reads:
)
How to Fix QuickBooks Desktop Installation Errors (Windows & Mac)?
QuickBooks is the first choice and is popular as one of the topmost small business accounting tools in the market to date. However, when something goes wrong or when you find yourself stuck while using the marvelous accounting software, things may not always seem to be smooth sailing. QuickBooks desktop installation errors are one of the most common errors that you might bump into, and find a bit tricky to fix.
To make this task much easier and convenient for you, we brought this post today for you, wherein we have picked the most effective solution for eliminating QuickBooks desktop install errors. Thus, ensure sticking to this space till the end. You can also contact us using our customer support helpline.
List of installation errors in QuickBooks
You can see any of the following installation errors in QuickBooks desktop:
- QuickBooks Error 1402
- Error 1603
- QuickBooks Error 1722
- Error 1903
- Error 1935
- Microsoft .net framework errors
- Damaged msxml related errors
- QuickBooks Error 1712
- Error in verifying the subscription.
- ABS PDF driver errors
Methods for resolving QuickBooks desktop installation errors
You can try resolving the installation errors in QuickBooks desktop using the below methods:
Method 1: Closing QBW32.exe process

- Herein, you are required to right click the windows task bar and select the option labelled as start task manager.
- Click on the processes tab.
- And click to the image name header to sort it alphabetically.
- Moreover, locate it and select exe.
- Lastly, go for the end processes tab.
Method 2: Using QuickBooks install diagnostic tool
- Under this method, you are required to close QuickBooks.
- Download the QuickBooks tool hub and save the file where you can access it with much ease.
- Further, open the file.
- Pay heed to the onscreen prompts to install and agree to the terms and conditions.
- Double click the icon.
![]()
- Select the installationissues.
- Select the QuickBooks install diagnostic tool and let the tool run.

- Have some patience to deal with this.
- And reboot the system when done.
Can’t find an ideal solution in the above list? Well, not an issue anymore, we are here to rescue you. Simply connect with our U.S based accounting experts by means of our dedicated QuickBooks error support linei.e.1-800-761-1787. Our accounting professionals and CPA’s will ensure that none of your queries remain unanswered.
Most searchable topics for you
?)
How to Fix QuickBooks Desktop Update Errors?
QuickBooks since its inception has managed to cater some of the best features and functionalities, making it the best accounting software. The only drawback of this software can be that it is prone to certain types of errors. One such errors can be as QuickBooks desktop update errors. These errors can pop up on the screen when you try to download the update. Also, these errors can hinder the process.You might get a reminder from the software itself, whenever a newer update is available.
In case you are a victim of such an error, then we can surely help you with this piece of writing. Or you can also connect with our team professionals using our dedicated helpline.
What instigates QuickBooks update errors?
- You can end up in update errors if you have poor internet connection.
- Restrictive settings of personal firewall or internet security can be another trigger.
- In case of multiple instances of QuickBooks are seen on the same system, then this sort of error is common.
Methods to resolve QuickBooks desktop update errors
You can try to resolve QuickBooks update errors by performing any of the below methods:
Method 1: Configuring internet security
Configuring the firewall setting and internet security application settings:

- Press the start tab and look for QuickBooks database server manager.
- Click on QuickBooks database server manager from the list and click on the port monitor tab.
- Note down the port number of the version of QuickBooks desktop.
- Click on the start tab and search for the windows firewall.
- Go for the windows firewall and click on the advanced settings tab.
- Right click the inbound rules tab and then hit new rule.

- Click the port tab and hit next.
- Enable the TCP option.
- Check mark the specific local ports and enter port number.
- Click on next and select allow the connection.
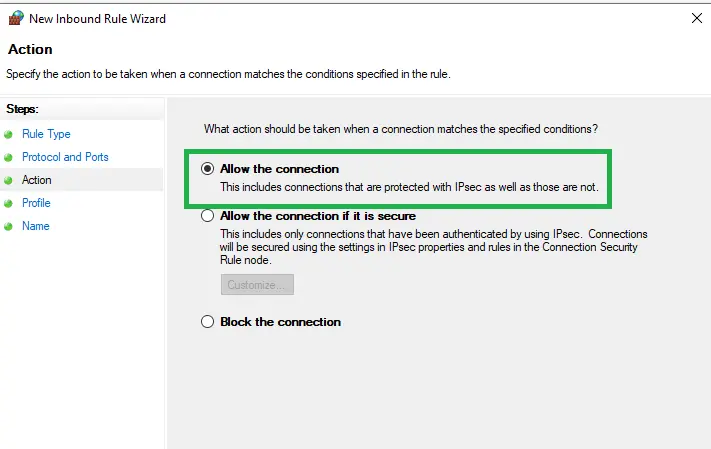
- Hit next again and name the new rule.
- Perform the same steps for outbound rules.
Method 2: Installing digital signature certificate
- Move to the C:Program FilesIntuitQuickBooks.
- Right click the QBW32.exe and select the properties tab.
- Move to the digital signature tab and ensure that intuit is selected in the signature list.
- Select the details tab.
- In the digital signature tab ensure that Intuit is selected in the signature list.
- Select the details tab.
- And in the digital signature window, select the view certificate tab.
- And select the install certificate option.
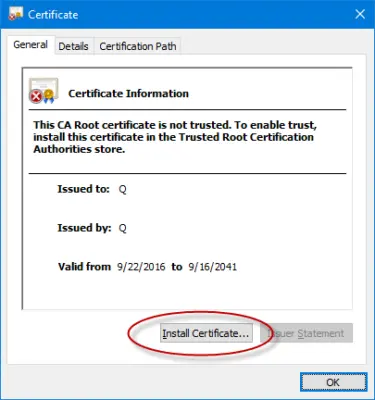
- Click on next tab, until the finish tab that appears on the screen and select finish tab.
- Reboot the system.
- End the process by opening QuickBooks and re-download the update.
Implementing the above scribbled steps would ensure easy rectification of QuickBooks update errors.
However, if you are stuck at any point of time, or if you need our assistance, then do not think twice, simply ring up to our U.S. based accounting professionals using our QuickBooks support helpline i.e.1-800-761-1787. Our team of accounting experts will ensure to cater the best possible support services instantly.
People also searched for:

How to Fix Data Damage Issue in QuickBooks Desktop Company File?
QuickBooks is the first choice and is popular as one of the topmost small business accounting tools in the market to date. However, when something goes wrong or when you find yourself stuck while using the marvelous accounting software, things may not always seem to be smooth sailing. Data damage in QuickBooks desktop company file is one such common issue that the user might bump into, and find a bit tricky to fix.
To make this task much easier and convenient for you, we brought this post today for you, wherein we have picked the most effective solution for eliminating the data damage issue on your QuickBooks desktop company file. Thus, ensure sticking to this space till the end.
Possible solution steps to fix data damage on QuickBooks desktop
The user can try to resolve the QuickBooks data damage by performing the below stated methods:
Method 1: Repairing the company file using rebuild data tool
Use verify and rebuild data tool in QuickBooksin order to sort this error:
- Head to the file menu, and hover over the utilities tab and select rebuild data.
- Select ok, on the QuickBooks information window. Perform the onscreen steps to save the backup.
- Let the tool repair the file. This might take some time. QuickBooks might seem stuck, but not in actual.
- Hit ok tab when the tool finishes its task.

- Head to the file menu and hover over the utilities tab and pick verify data.

- Let the tool check the file for data issues.
Just in case QuickBooks doesn’t find any issues, hit ok tab. You can keep using the company file. You don’t have any data damages.

If QuickBooks finds an issue with the company file and go for the rebuild now.
Method 2: Manually fix data errors
- Head to the file menu and hover over the utilities tab and select verify data.
- Let the tool check the file for data issues.
- From verify rebuild screen, select expand all to see the errors.
- Select see online article, if the error doesn’t get resolved.
Can’t find an ideal solution in the above list? Well, not an issue anymore, we are here to rescue you. Simply connect with our U.S based accounting experts by means of our dedicated QuickBooks customer support linei.e.1-800-761-1787.
Our accounting professionals and CPA’s will ensure that none of your queries remain unanswered.
